

BFTC - BlackFin Tool Chain
Questo plug-in, é dedicato allo sviluppo di applicazioni o librerie per DSP della serie Blackfin presenti nei nostri prodotti.
Il compilatore utilizzato é il GCC 4.5.3
Il compilatore utilizzato é il GCC 4.5.3
L'ambiente di sviluppo permette di:
- Creare il file di progetto
- Editare i sorgenti C
- Compilare e linkare tutto il progetto
- Caricare in flash/ram il binario
- Lanciare una emulazione terminale per il debug del programma
This plug-in is meant to develop applications or libraries for DSP of the Blackfin series that are present in our products.
Used compiler is the GCC 4.5.3
Used compiler is the GCC 4.5.3
The development environment allows to:
- Create a project file
- Edit C source files
- Compile and link the complete project
- Upload binary in flash/ram
- Open a terminal emulator for program debugging
INSTALLAZIONE
Per installare mdi occorre aprire l’archivio scaricato dal ns. sito e copiarlo in una cartella di lavoro.
È importante ricordare di eseguire sempre il programma (mdi.exe) sempre in modalitá amministratore.
La seconda operazione da effettuare é quella di richiedere una licensa di abilitazione di mdi, senza questa licensa mdi non permetterá di salvare i files creati o modificati.
La licenza é assolutamente gratuita per richiederla inviare una email a:
Il contenuto della email é di tre righe:
Azienda/Istituto
Nome Cognome
Email
In poche ore riceverete un file XML che andrá a sovrascrivere quello presente nella cartella BIN/CONFIG.
Adesso possiamo lanciare mdi con doppio click sul file mdi.exe che ha questa icona: 
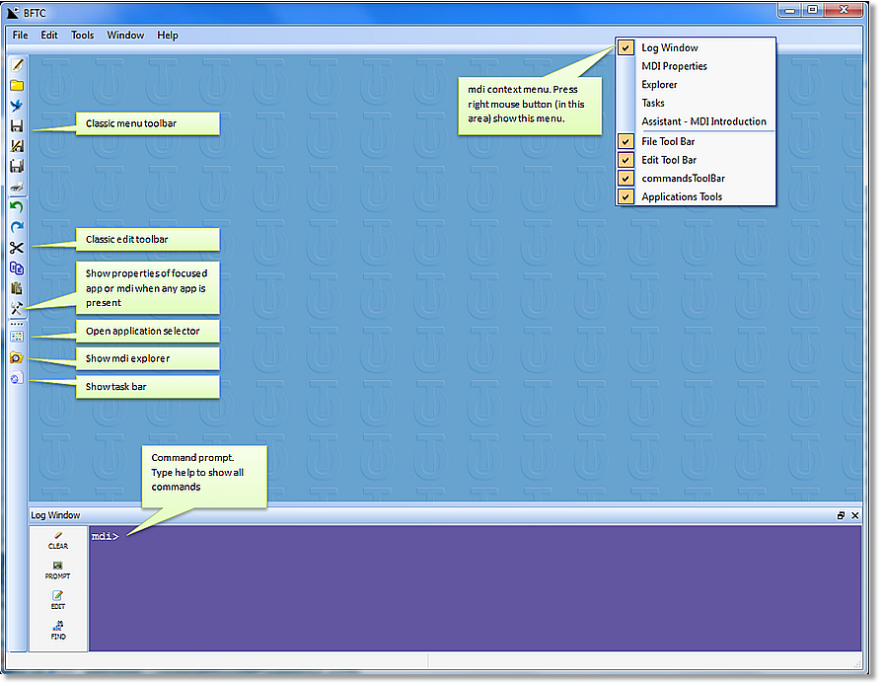
A caricamento terminato comparirá:
INSTALLATION
To install mdi you have to open the archive downloaded from ours site and copy into a folder.
It is important to remember to always run the program (mdi.exe) always in administrator mode.
After that you need to apply for a mdi license. Without this license you will not be able to save or modify files you created.
In order to obtain the – completely free of charge – license you can send an e-mail to:
The e-mail message consists of three lines:
Company/Institute
First and last name
E-mail
Within a few hours you will receive an XML file that will overwrite the one in the BIN/CONFIG folder.
Now we can launch mdi with double click on the mdi.exe file that has this icon:
When finished, it will appear:
IMPOSTARE IL PLUG-IN
Se l'icona che presenta la finestra visualizzata é la seguente: 
Saltate questa parte perché mdi é pronto all'utilizzo.
In questo passo imposteremo BFTC come applicazione di partenza di mdi.
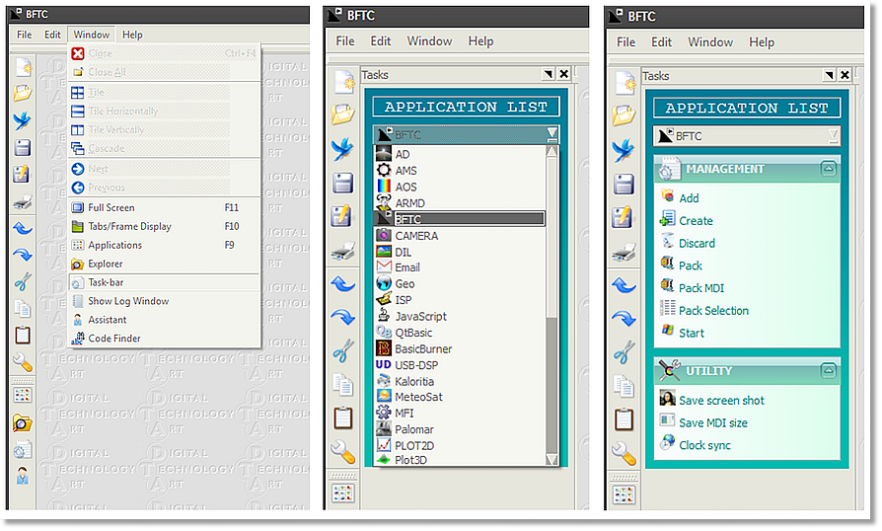
Selezionate la voce Task-bar dal menu Window:
A questo punto la finestra del Task-bar si sará aperta, adesso selezionate dal combo-box in alto (APPLICATION LIST) BFTC
Infine selezionate Start nel gruppo MANAGEMENT
Fatta questa operazione mdi é pronto ad operare con BFTC e sará cosi per sempre, a meno che non si decida di cambiare ....
PLUGIN SETTINGS
If the following icon is shown: 
you can skip this part as mdi is ready for use.
We will now set BFTC as the initial mdi application.
First select the Task-bar tab from the Window menu:
The Task-bar screen will open and you can select BFTC from the combo-box at the top (APPLICATION LIST).
Then select Start in the MANAGEMENT group.
From now on mdi will always be ready to perform with BFTC, unless you decide to change ....
Se questa voce non fosse peró presente significa che mdi non ha disponibile questo modulo, per cui occorre prima scaricare l’archivio che lo contiene (al fondo di questa pagina) poi selezionare il comando Add su MANAGEMENT specificando la cartella dove questo è stato copiato.
Una volta fatta questa operazione e riavviato il programma siamo pronti, BFTC é attivo e presente su mdi.
If this entry is not present, this means that mdi does not have this plugin loaded, so you must first download it (see at the bottom page), then select the Add command from MANAGEMENT specifying the folder where this was copied.
Once this is done and restarted the program we are ready, BFTC is now an active plugin.
CREARE UN NUOVO PROGETTO
Selezionate l'icona  oppure File > New
Si aprirá una finestra:
CREATING A NEW PROJECT
Select the icon or File > New.
The following screen will appear:
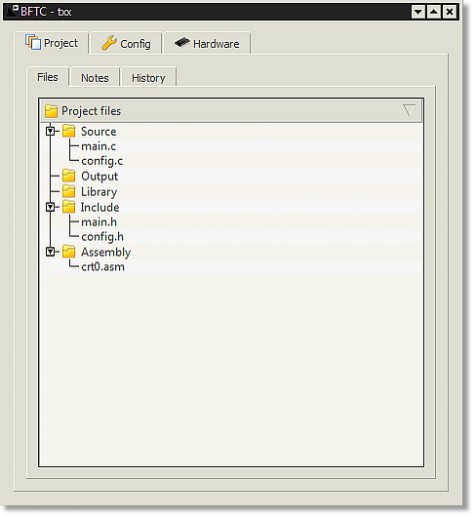
Fatta questa operazione vi comparirá la pagina principale di BFTC dove viene visualizzato l'albero dei files presenti nel progetto.
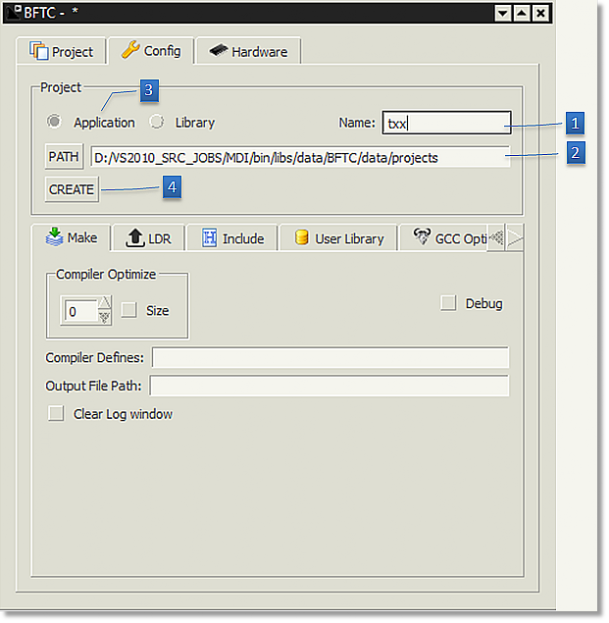
Adesso é importante specificare:
- Il nome che diamo al progetto che vogliamo creare
- Il cammino dove il nostro progetto sará creato.
- Decidere se quello che si va a creare é una libreria o una applicazione
- Infine premere questo pulsante per finalizzare la creazione del progetto.
Tutti i restanti controlli ed impostazioni possono essere successivamente cambiati in ogni momento.
The BFTC first page will now appear, where the tree of files that are present in the project will be shown.
It is now important to specify:
- The name you want to give the project you are going to create.
- The path where the project will be created.
- Decide whether you want to create a library or an application.
- Finally, click this button to complete the creation of the project.
Subsequently you can modify all remaining controls and settings at all times.

MENU CONTESTUALE
É possibile interagire con la lista dei files e cartelle dell'albero di progetto con l'interazione del mouse:
- Un doppio click sul file lo apre in un text editor
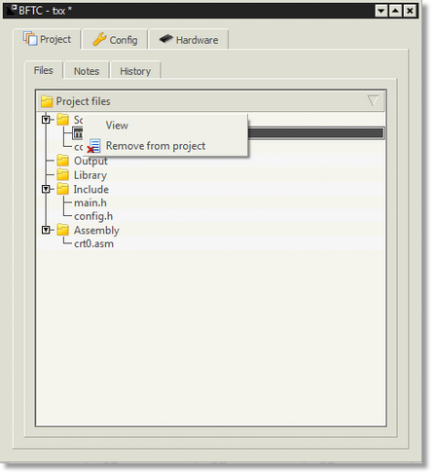
- Selezionando una cartella od un file premendo il tasto di destra del mouse compare un menu contestuale.
CONTEXTUAL MENU
It is possible to interact with the list of files and folders of the project tree through mouse interaction:
- When double clicking a file, it will be opened in a text editor.
- When selecting a folder or a file by right-clicking the mouse, a contextual menu will appear.


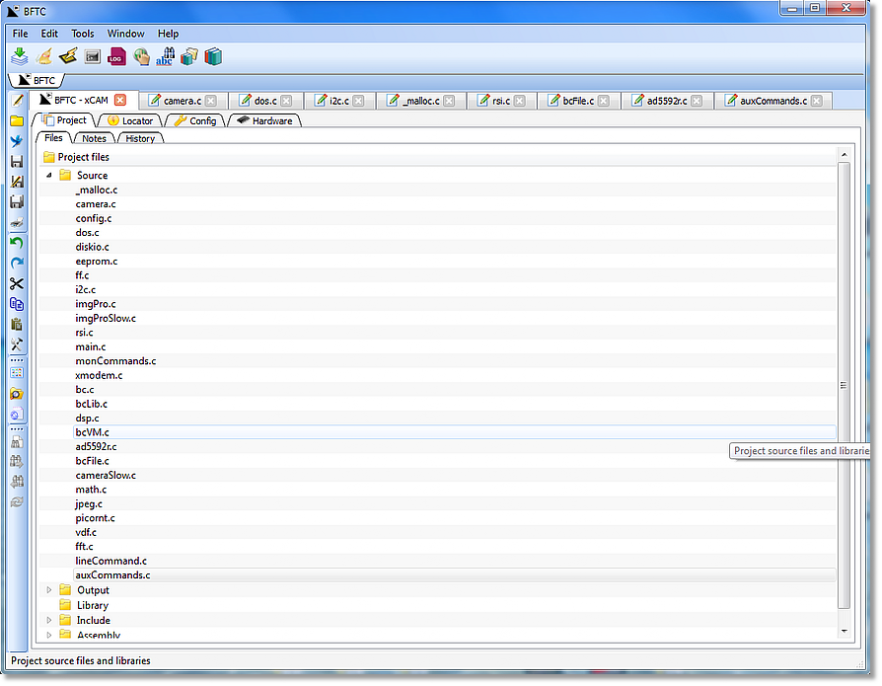
Aprendo molti file del progetto potremmo trovarci con il desktop molto affollato e con le finestre non facilmente raggiungibili.
When opening many project files, your desktop could get really crowded, which may slow down the screen display.

É consigliabile che scegliate questo modo di visualizzazione per avere piú ordine sul desktop.
We advise you to select the following display mode for a better organized desktop

Selezionando questo modo di visualizzazione avremo …
When selecting the following display mode, you will obtain …
Dalla lista dei file presenti ci si rende conto che in automatico vengono creati diversi files:
config.h config.c main.h main.c
Sono il file di base del progetto ed in particolare uno di questi: config riporta tutte le impostazioni hardware del DSP e software relative al progetto.
É assolutamente sconsigliato effettuare modifiche a questo file in quanto verrebbero sovrascritte ad ogni variazione delle impostazioni hardware!
Adesso selezionate la scheda BFTC e dal menu lanciate il comando MAKE dall'icona 
Tutti i file del progetto verranno compilati e collegati alla fine (se non ci sono errori) verrá prodotto un file di binario (.LDR)
Durante la compilazione si attiva una finestra di log dove vengono riportati tutti i messaggi diagnostici ed informativi del compilatore e del linker alla fine del processo si attiva in automatico una seconda applicazione mdi chiamata ISP che vi permette immediatamente di caricare nella FLASH del Vs. hardware il firmware creato.
Alla fine della compilazione (anche se ha esito positivo) potrebbe comparirvi qualcosa del genere:
From the list of present files various new files will be created automatically:
config.h config.c main.h main.c
They are the project’s base files. One file in particular: config contains all hardware settings of the of the DSP and the project related software.We severely advise you against modifying this file, as it will be overwritten every time the hardware settings are changed!
Now select the BFTC directory and run the MAKE command from the icon:
All project files will be complied and linked. In the end (when no errors occur) a binary file (.LDR) will be created.
During compilation a log screen will be activated showing all diagnostic and informative messages of the complier and linker. At the end of the process a second mdi application called ISP will be activated automatically, allowing you to upload instantly the created firmware in FLASH of your hardware.
At the end of the compilation a screen similar to the following will be shown:
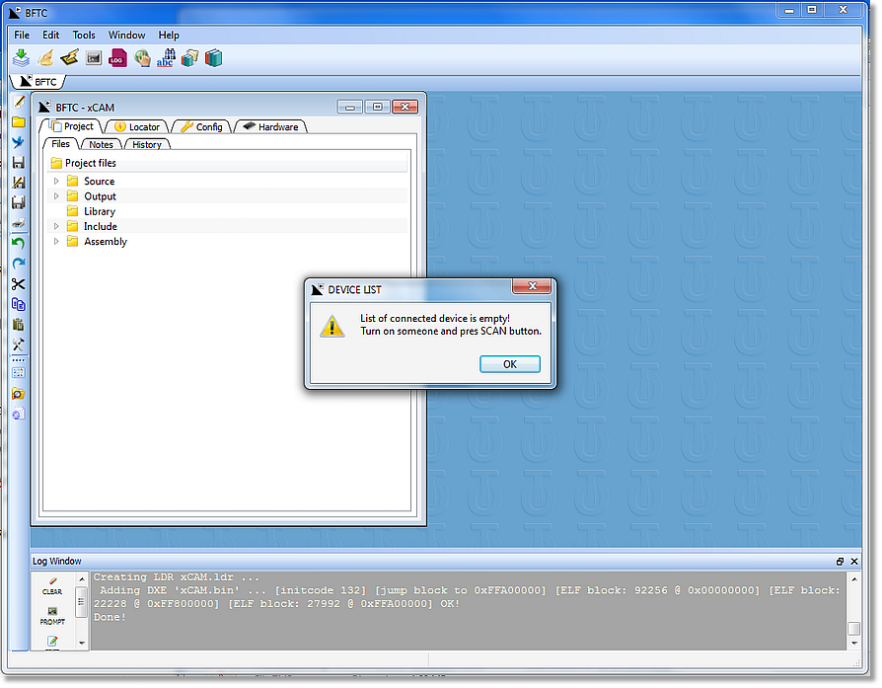
Significa che il programma ha tentato di selezionare un dispositivo
collegato ma nessuno di questi è presente nella lista per cui l’upload è fallito.
La lista dispositivi si trova nella cartella CONFIG/LDR e si puó presentare in
questo modo:
This means that the program attempted to select a connected device but none of these are in the list for which the upload failed.
The device list is in the CONFIG-LDR folder and can be presented as follows:
Normalmente quando BFTC viene eseguito fra le prime operazioni
cerca i dispositivi collegati e li propone in questo contenitore di lista, se
peró alla partenza i dispositivi non fossero collegati o spenti occorre
eseguire una nuova scansione con il tasto SCAN e poi selezionare sulla lista
popolata il dispositivo cercato.
A quel punto per tentare nuovamente un caricamento del
codice selezionare l’upload dall’icona: 
Normally when BFTC is executed between the first operations, search for the connected devices and put them in this list box, if at the start there aren't connected or switched off devices, it is necessary to perform a new scan (SCAN key) and then select a device the populated list.
Then try to load a code again selecting upload from the icon:
IMPOSTAZIONI
BFTC ha diverse pagine dedicate alla configurazione software ed hardware, proviamo ad esaminarle:
PROJECT
SETTINGS
BFTC has various pages that are dedicated to software and hardware configuration. In the following, we will examine them more closely:
PROJECT SCHEME
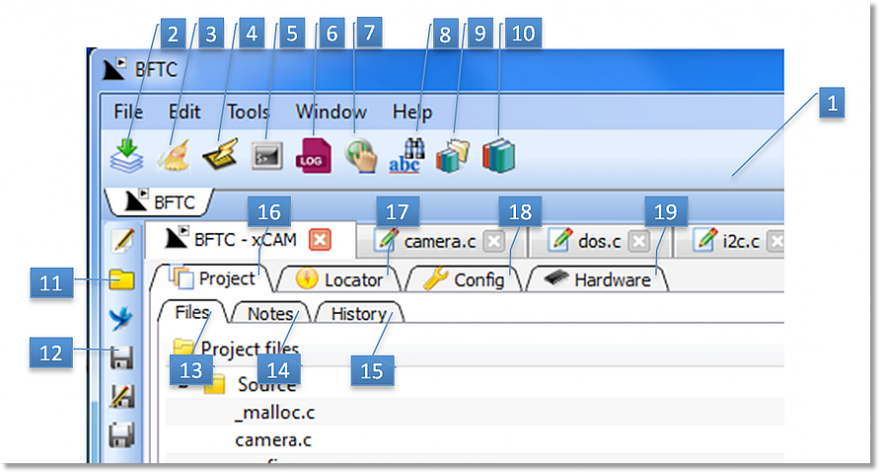
- Toolbar di BFTC
- MAKE compilazione e collegamento di tutti i sorgenti e librerie
- Cancella tutti i file oggetto compilati costringendo la compilazione di tutti i moduli
- Lancia ISP, applicazione per il caricamento in FLASH di un binario o per l'apertura del terminale
- Apre una emulazione terminale
- Permette di creare un file di LOG per l’emulazione terminale
- TOUCH del progetto, causa la rigenerazione dei file di configurazione
- GREP, funzione che ricerca in tutti i moduli sorgente un testo
- Apre e permette di editare la libreria EMBEDDED
- Visualizza l’help della libreria EMBEDDED
- Apre un file di progetto
- Salva il progetto
- Cartella che visualizza i files di progetto
- Editor che contiene note di testo relative al progetto
- Editor che contiene informazioni alla storia delle revisioni relative al progetto
- Scheda relativa ad i file di progetto
- Stabilisce dove i file del progetto devono essere locati, se in RAM interna (400MHz) o SDRAM esterna (133MHz)
- Scheda che accede all'impostazione della creazione del codice
- Scheda che accede all'impostazione delle periferiche del DSP
- BFTC Toolbar
- MAKE compilation and linking of all sources and libraries
- Deletes all compiled object files obliging the compilation of all modules
- Starts ISP, the application for the upload of a binary in FLASH or to open the terminal
- Open a terminal emulator
- Create a log file on terminal emulator activity
- TOUCH of the project, causes the regeneration of the configuration files
- GREP, a function that searches a text in all source modules
- Opens and allows editing of the EMBEDDED library
- Visualizes HELP of the EMBEDDED library
- Open a project file
- Save the project
- Folder that visualizes the project files
- Editor containing text notes related to the project
- Editor containing information related to the project’s revision history
- Folder related to the project files
- Set where the file code will be located, is possible to choose the embedded RAM (400Mhz) or the external SDRAM (133MHz)
- Folder that enters the code creating settings
- Folder that enters the settings of the DSP peripherals
CONFIG
CONFIG SCHEME
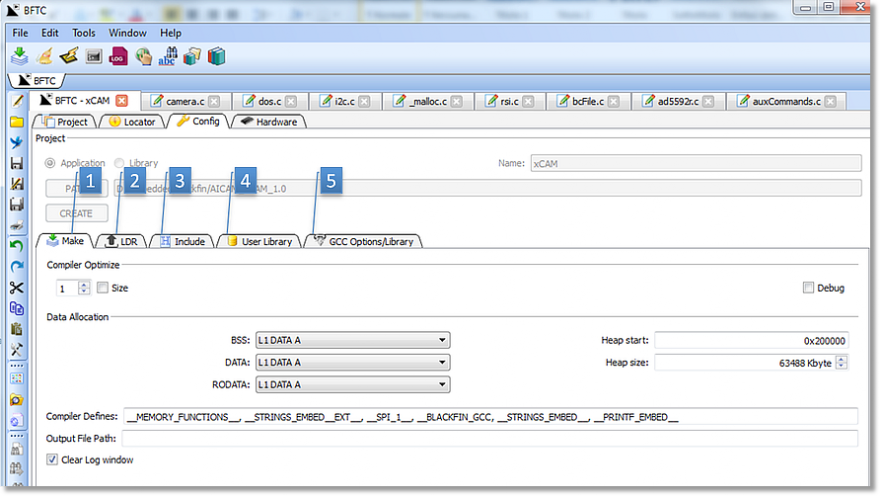
Questa scheda gestisce le opzioni di compilazione e collegamento.
- Scheda dedicata alla modilità di creazione del codice
- Configurazione del loader
- Ricerca dei file di inclusione
- Librerie utente impiegate
- Librerie GCC
This scheme manages the compiling and linking options.
- Folder for the code creating procedure
- Loader configuration
- File Inclusion Search
- Applied user libraries
- GCC libraries
CONFIG MAKE
CONFIG MAKE
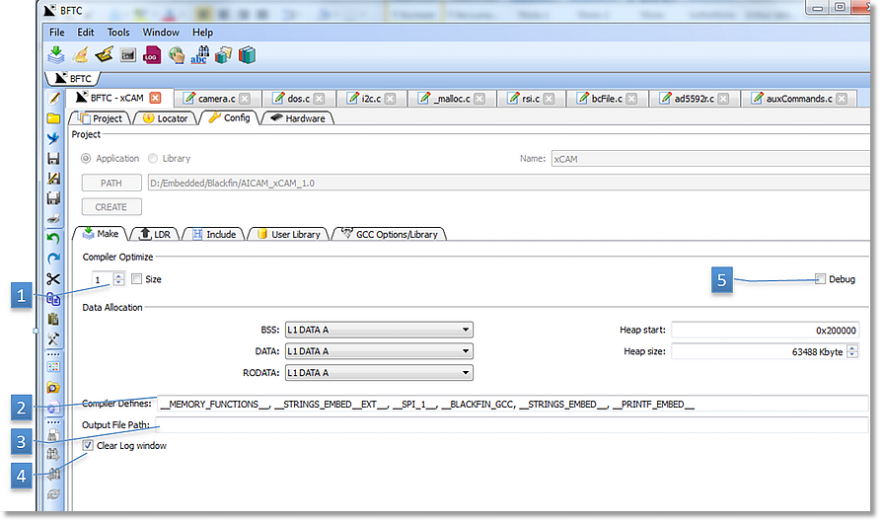
- Impostazione ottimizzazione del codice
- Definizioni passate al compilatore.
- Cammino dove viene memorizzato il file binario di output
- Abilitando questo controllo la finestra di LOG viene automaticamente pulita all’inizio di ogni compilazione
- Scegliendo DEBUG vengono riportate nel file binario in uscita anche le informazioni necessarie al tracciamento del programma. Inutile se non si dispone di un emulatore JTAG.
- Code optimization settings.
- Definitions passed to compiler.
- Path where binary output file is stored.
- When activating this control, the LOG screen will be automatically cleaned at the start of every complation.
- When selecting DEBUG, the required data for program tracing will also be reported in the binary output file. It is useless if you do not have a JTAG emulator.
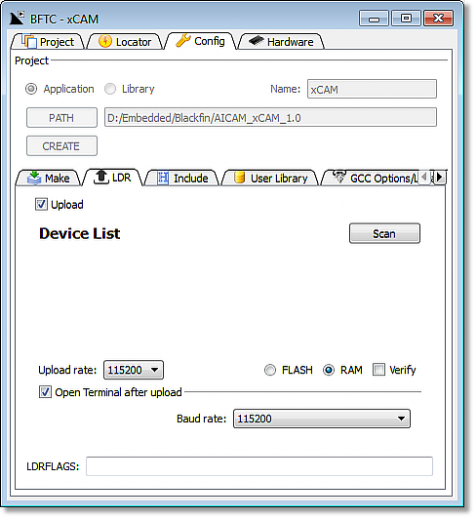
CONFIG LOADER
Scheda che permette di impostare il LOADER.
CONFIG LOADER
Scheme allowing to set the LOADER.
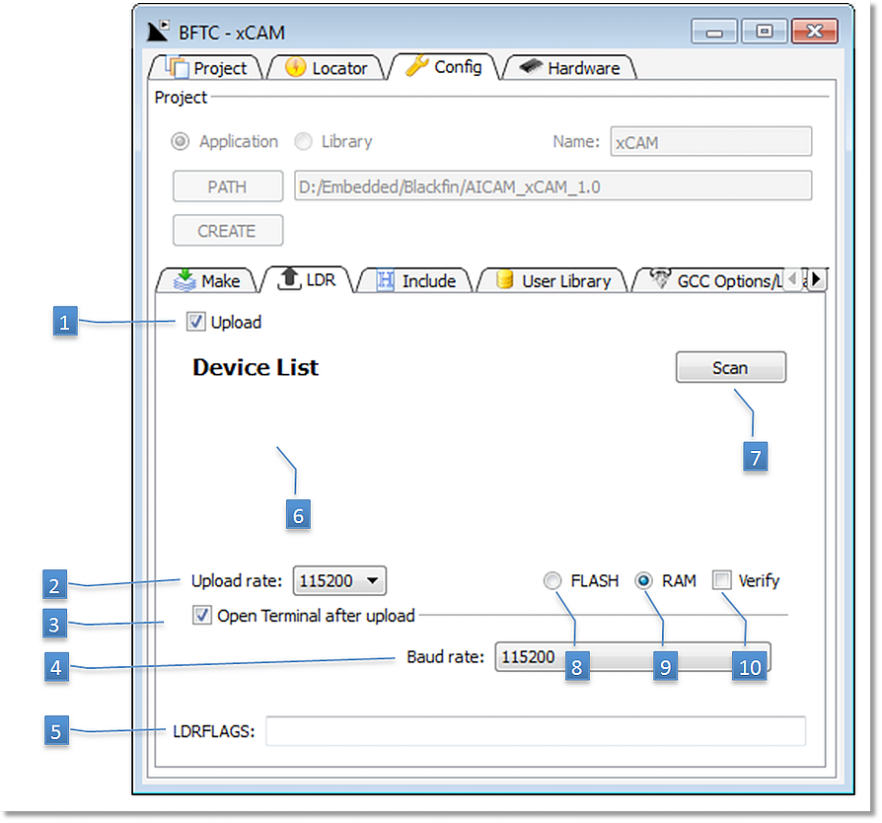
- Se abilitato esegue dopo la compilazione, se non ha dato errori, il caricamento del binario prodotto
- Porta seriale utilizzata per il caricamento
- Se abilitato a fine upload apre una finestra emulazione terminale
- Baud rate emulazione terminale
- Parametri aggiuntivi che possono essere settati per il comando LDR
- Lista dispositivi che possono essere connessi
- Esegue la scansione per la ricerca dispositivi
- Stabilisce che il codice prodotto verrá caricato in FLASH
- Stabilisce che il codice prodotto verrá caricato in RAM
- Verifica dopo la scrittura in FLASH
- When activated, after compilation and in the absence of errors, it will upload the created binary.
- Serial port used for uploading.
- If checked open a terminal emulation after upload process.
- Baud rate used by terminal emulation.
- Additional parameters that can be set for the LDR command.
- List of device that can be connected.
- Search compatible device for connection
- Created code will be loaded in FLASH
- Created code will be loaded in RAM
- If checked verify FLASH writing
CONFIG LIBRERIA UTENTE
Settaggio delle librerie impiegate
CONFIG USER LIBRARY
Scheme allowing the setting of the libraries used.
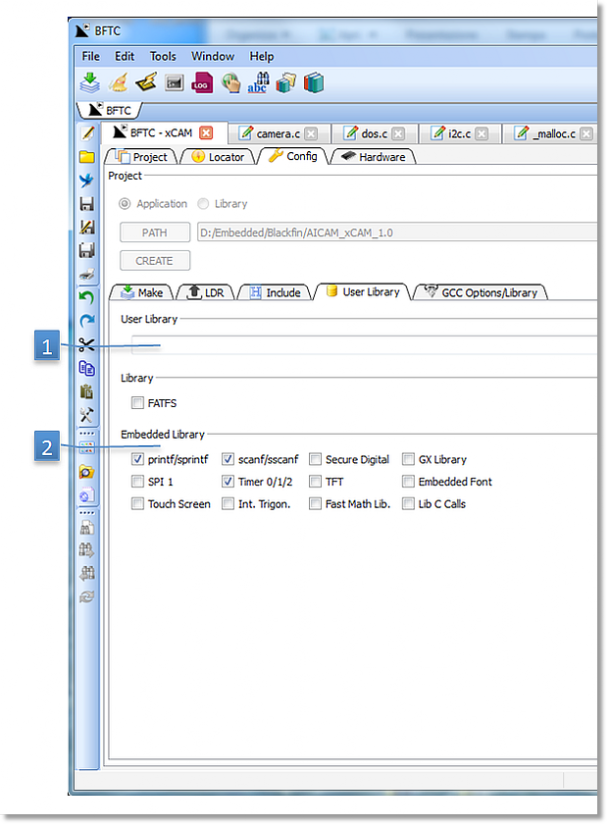
Scheda che permette di impostare le librerie utilizzate.
- Lista delle librerie utente (compresa estensione) separate dalla virgola
- Selezione delle librerie EMBEDDED
Allow to setup used library.
- User library list (incl. extension) divided by a comma
- Selection of the EMBEDDED libraries
CONFIG LIBRERIA GCC
Scheda che permette di impostare le librerie utilizzate dal GCC.
CONFIG GCC LIBRARY
Scheme allowing the setting of the libraries used by GCC.
Queste sono le librerie specifiche per Blackfin:
-mfast-fp Fast floating point library
libbfdsp The DSP run-time library which contains a broad collection of functions that are commonly required by signal processing applications.
libbfinbsp the library for GNU Low-level OS Support
The specific libraries for the Blackfin are listed hereafter:
-mfast-fp Fast floating point library
libbfdsp The DSP run-time library which contains a broad collection of functions that are commonly required by signal processing applications.
libbfinbsp the library for GNU Low-level OS Support
CONFIG INCLUDE
Scheda che permette di impostare le locazioni dove andare a ricercare i file di include utilizzati.
Le varie locazioni sono separate dalla virgola.
CONFIG INCLUDE
Scheme allowing to set the path where to find the used include files.
The path are divided by a comma.

HARDWARE CORE
CONFIG HARDWARE CORE
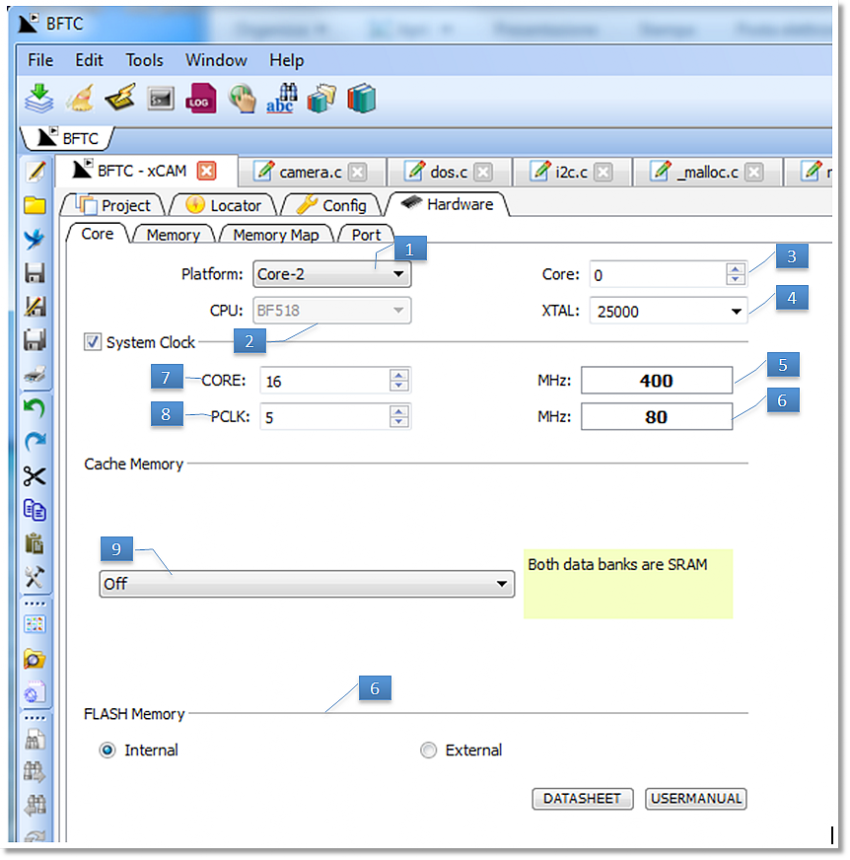
Da questa scheda si ha la possibilitá di configurare le periferiche del DSP e di impostare alcuni parametri specifici dell’hardware utilizzato. Tutte le impostazioni fatte in queste schede saranno poi convertite in codice C e salvate all’interno dei file config.c e config.h
- Scelta della piattaforma hardware utilizzata
- Scelta DSP utilizzato
- Selezione CORE del DSP
- Frequenza del quarzo utilizzata dal microcontrollore
- Frequenza finale clock DSP
- Frequenza finale clock periferiche
- Moltiplicatore clock base (4)
- Divisore per clock periferiche da clock DSP (5)
- Settaggio memoria CACHE
- Specifica su la FLASH di boot è interna o esterna
This scheme allows you to configure the DSP peripherals and to set some specific parameters of the used hardware. All settings made in these folders will be converted to C code and saved in the config.c e config.h files.
- Selection of the used hardware platform
- Selection of the used DSP
- CORE selection of the DSP
- Quartz frequency used by the microcontroller
- DSP clock
- Peripheral clock
- Multiply base clock (4)
- Divider for peripheral clock
- Set for CACHE memory
- Specify if FLASH is internal (DSP embedded) or external
HARDWARE MEMORY
CONFIG HARDWARE MEMORY
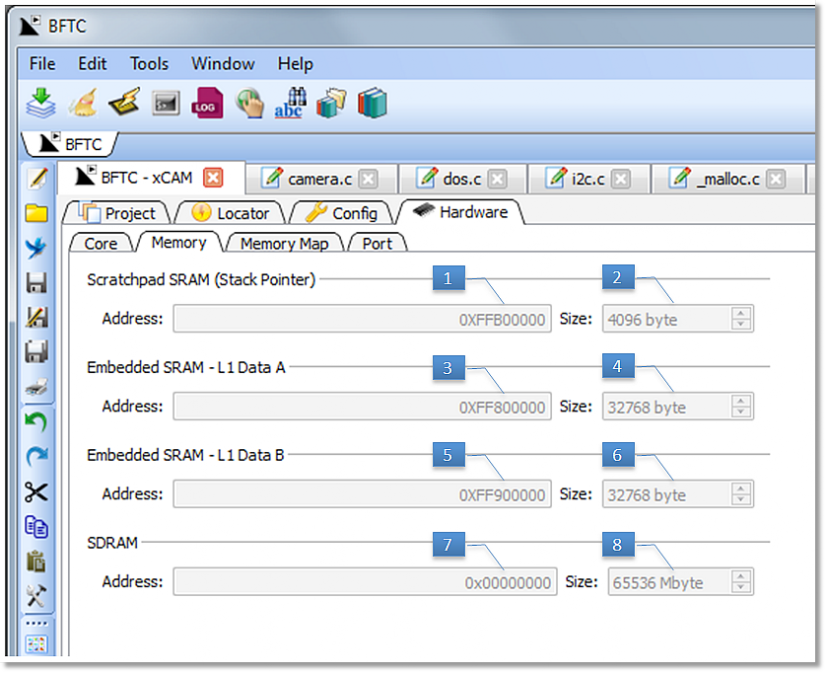
- Indirizzo base stack pointer (non cambiare)
- Dimensione stack pointer (non cambiare)
- Memoria RAM integrata 1, indirizzo base (non cambiare)
- Memoria RAM integrata 1, dimensione (non cambiare)
- Memoria RAM integrata 2, indirizzo base (non cambiare)
- Memoria RAM integrata 2, dimensione (non cambiare)
- Indirizzo base SDRAM esterna (non cambiare)
- Dimensione SDRAM esterna (non cambiare)
- Stack pointer base address (don't change)
- Stack pointer size (don't change)
- Embedded RAM 1 base address (don't change)
- Embedded RAM 1 size (don't change)
- Embedded RAM 2 base address (don't change)
- Embedded RAM 2 size (don't change)
- SDRAM base address (don't change)
- SDRAM size (don't change)
HARDWARE PORT
CONFIG HARDWARE PORT
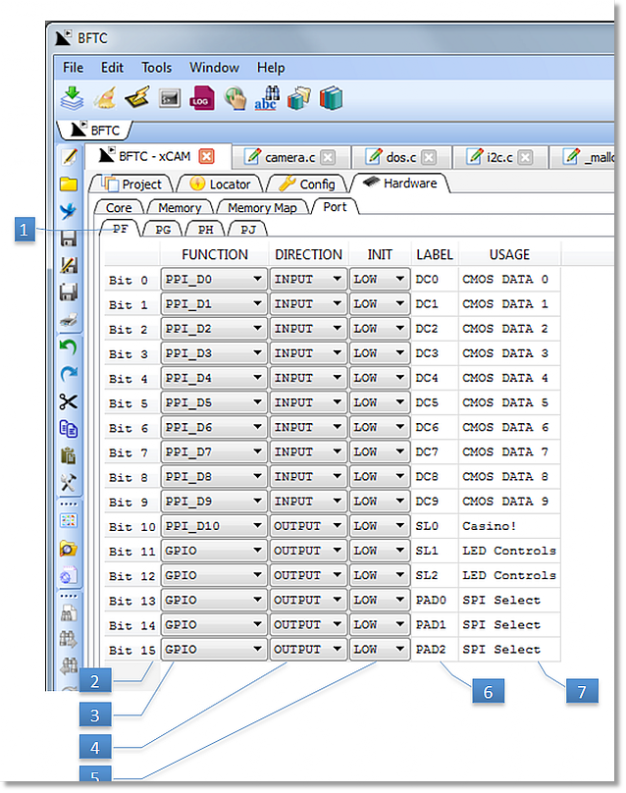
Questa scheda permette di configurare la memoria del nostro
hardware e di indicarne il suo utilizzo.
- Cartella che seleziona la porta del DSP
- Indicazione del bit
- Selezione funzione del bit
- Se GPIO seleziona se ingresso o uscita
- Se GPIO in uscita imposta il valore iniziale
- Etichetta richiamabile dal programma che
identifica il bit
- Commento di uso del bit
This scheme allows to set the memory of our hardware and to indicate its application.
- Folder selecting the DSP port
- Bit indication
- Selection of bit function
- If GPIO, indicates whether input or output
- If GPIO in output, sets the initial value
- Tag that can be recalled by the bit identifying program
- Comment of bit use
NOTE PER SHARKDUINO
Sharkduino per potersi collegare a BFTC ed eseguire i codici prodotti deve avere sempre essere impostato la modalitá di boot in posizione 6.
Anche quando si vuole caricare la FLASH interna occorre sempre partire dallo stessa modalitá di BOOT, poi una volta caricata si puó selezionare la posizione 4 per far eseguire a Sharkduino il codice li memorizzato ad ogni sua accensione o RESET.
A proposito del RESET premere sempre questo bottone prima di lanciare ISP !!!
NOTE FOR SHARKDUINO
In order to connect Sharkduino to BFTC and to the created codes, its BOOT modes must always be set in position 6.
If you want to upload the internal FLASH, you also need to start at the same BOOT mode. After uploading, you can select postion 4 in order to let Sharkduino run the memory code at every start or RESET.
Regarding RESET: never forget to press the switch shown below before starting ISP !!!

CONCLUSIONI
Questa non si puó certo chiamare una guida esaustiva, ma solo una breve introduzione, maggiori dettagli possono essere trovati nel manuale del GCC integrato nell’help mdi ed al manuale hardware del DSP raggiungibile da BFTC.
Si consiglia inoltre di partire sempre da un progetto di esempio normalmente fornito con i nostri prodotti.
CONCLUSIONS
This manual is not very exhaustive, but merely a short introduction. Further details can be found in the GCC manual which is integrated in the help mdi and the DSP hardware manual attainable through BFTC.
We advise you to always start with a sample project, which is usually supplied with our devices.